June 12, 2025
Flux Copilot: Under the Hood
Share
BuildWithFlux


This post will give you a deeper understanding of how Copilot works, how large language models (LLMs) and agentic systems operate under the hood, and why grounding them in engineering context matters. You'll walk away with concrete strategies to get better results — and a clearer sense of how your feedback can shape the future of AI-assisted design.
If you've ever used an AI tool and felt disappointed, you're not alone. Engineers expect precision, and sometimes get something unpredictable. However, that doesn’t mean AI is overhyped. Rather, it means AI is evolving, and we need to learn how to work with it.
AI — especially large language models — is already an incredibly powerful tool. It can synthesize knowledge from thousands of documents, surface insights instantly, and assist in real-time decision-making. But like any tool, it needs to be used correctly. Understanding how it works helps you unlock its full potential.
That’s why we’re writing this. The more you understand how Flux Copilot works under the hood, the more empowered you’ll be to use it effectively, and help shape what it becomes.
At the core of Copilot is a large language model (LLM) — a deep neural network trained on massive datasets to predict the next token in a sequence. In practice, this means it can understand natural language prompts, reason across technical contexts, and generate structured responses.
LLMs aren't "search engines" or "knowledge bases." They don’t retrieve information, they generate it, based on patterns learned during training. This is both their power and their risk: they can generalize across domains and produce fluent output, but they can also produce confident-sounding nonsense — what we call hallucinations.
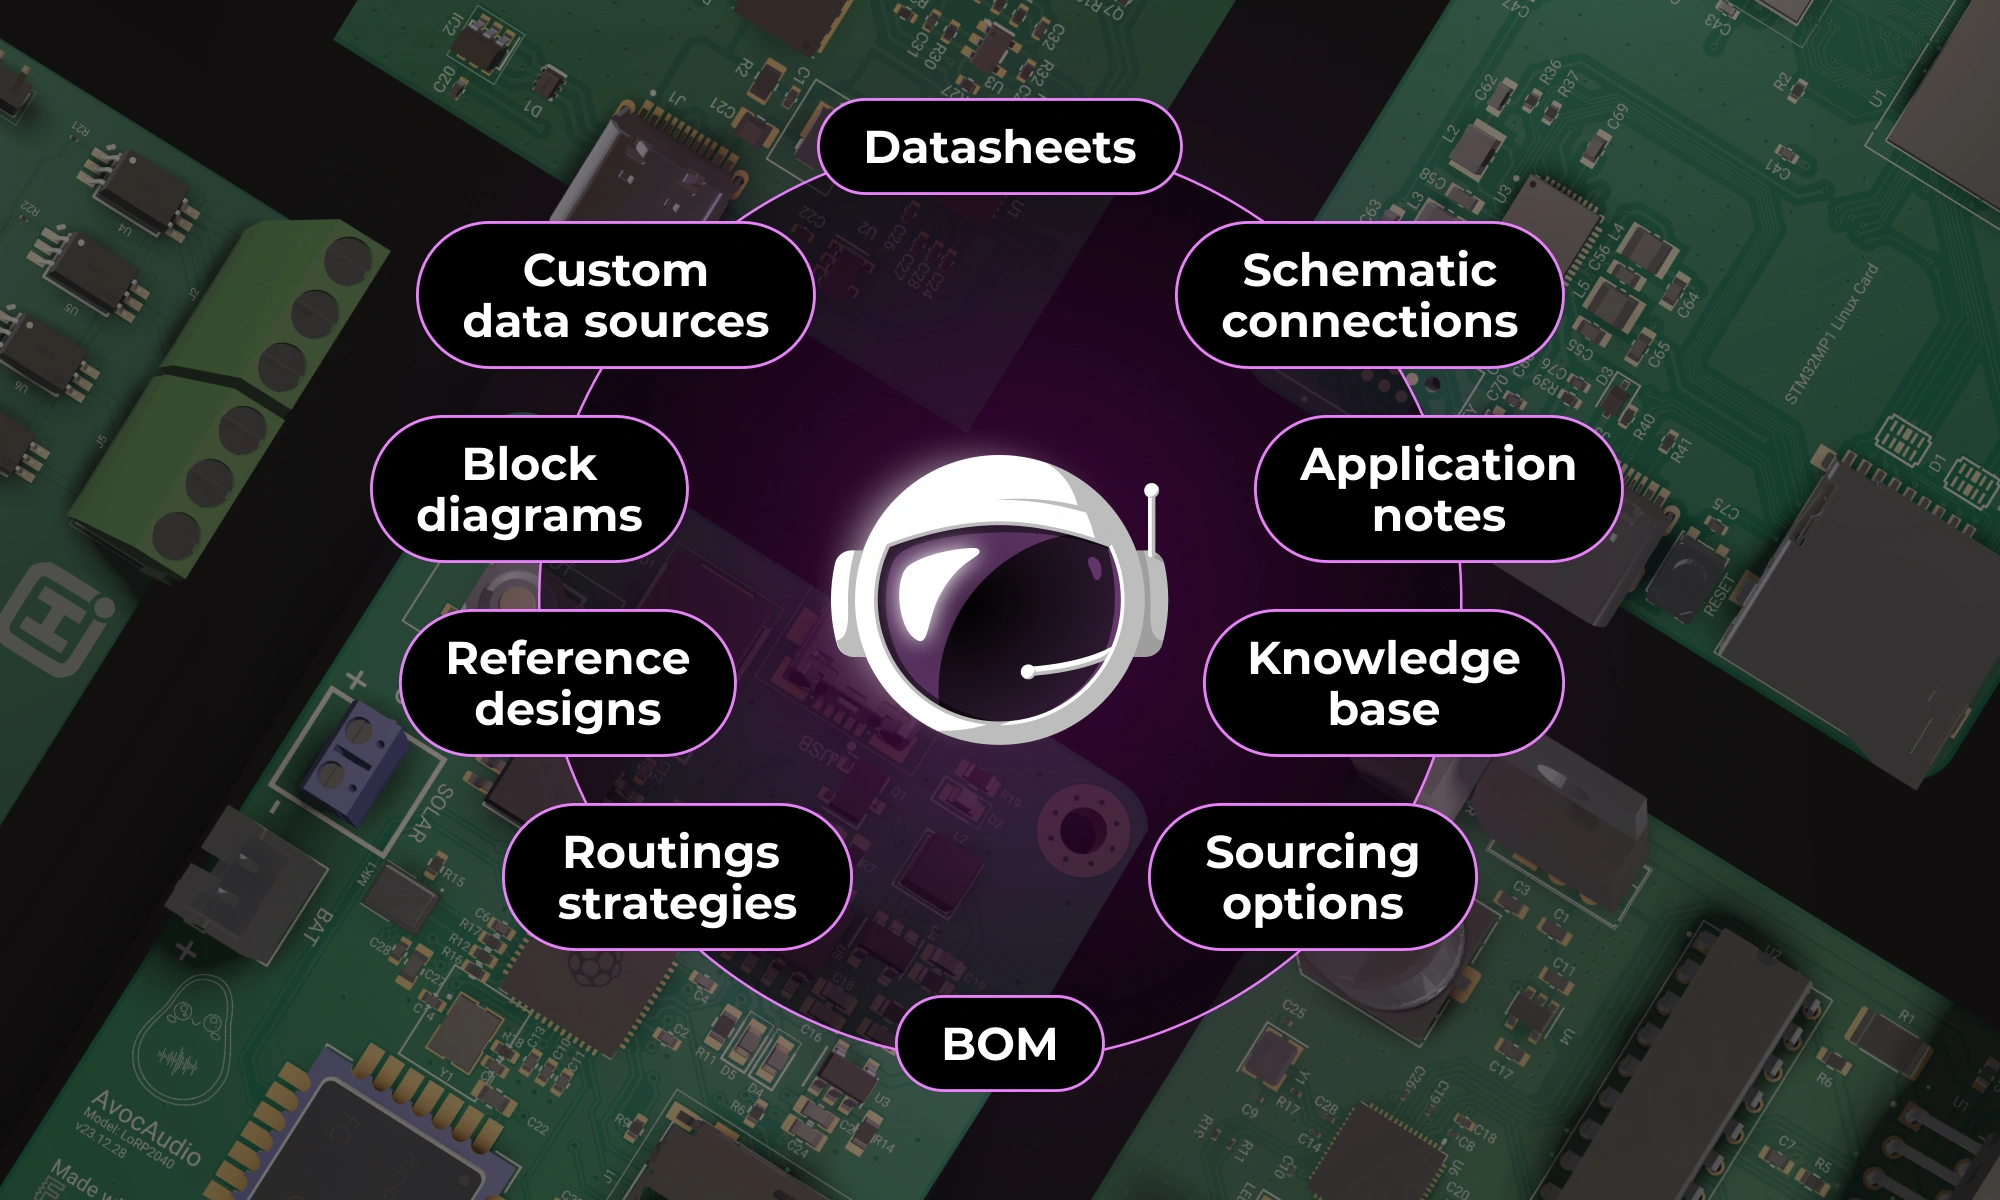
That’s why Copilot isn’t just a raw LLM. It’s an LLM grounded in structured, trustworthy data:
By combining generative reasoning with factual, contextual inputs, we reduce hallucinations and increase the reliability of Copilot’s suggestions. But it's not bulletproof. It can still generate plausible-sounding errors if the grounding data is missing, incomplete, or misinterpreted.
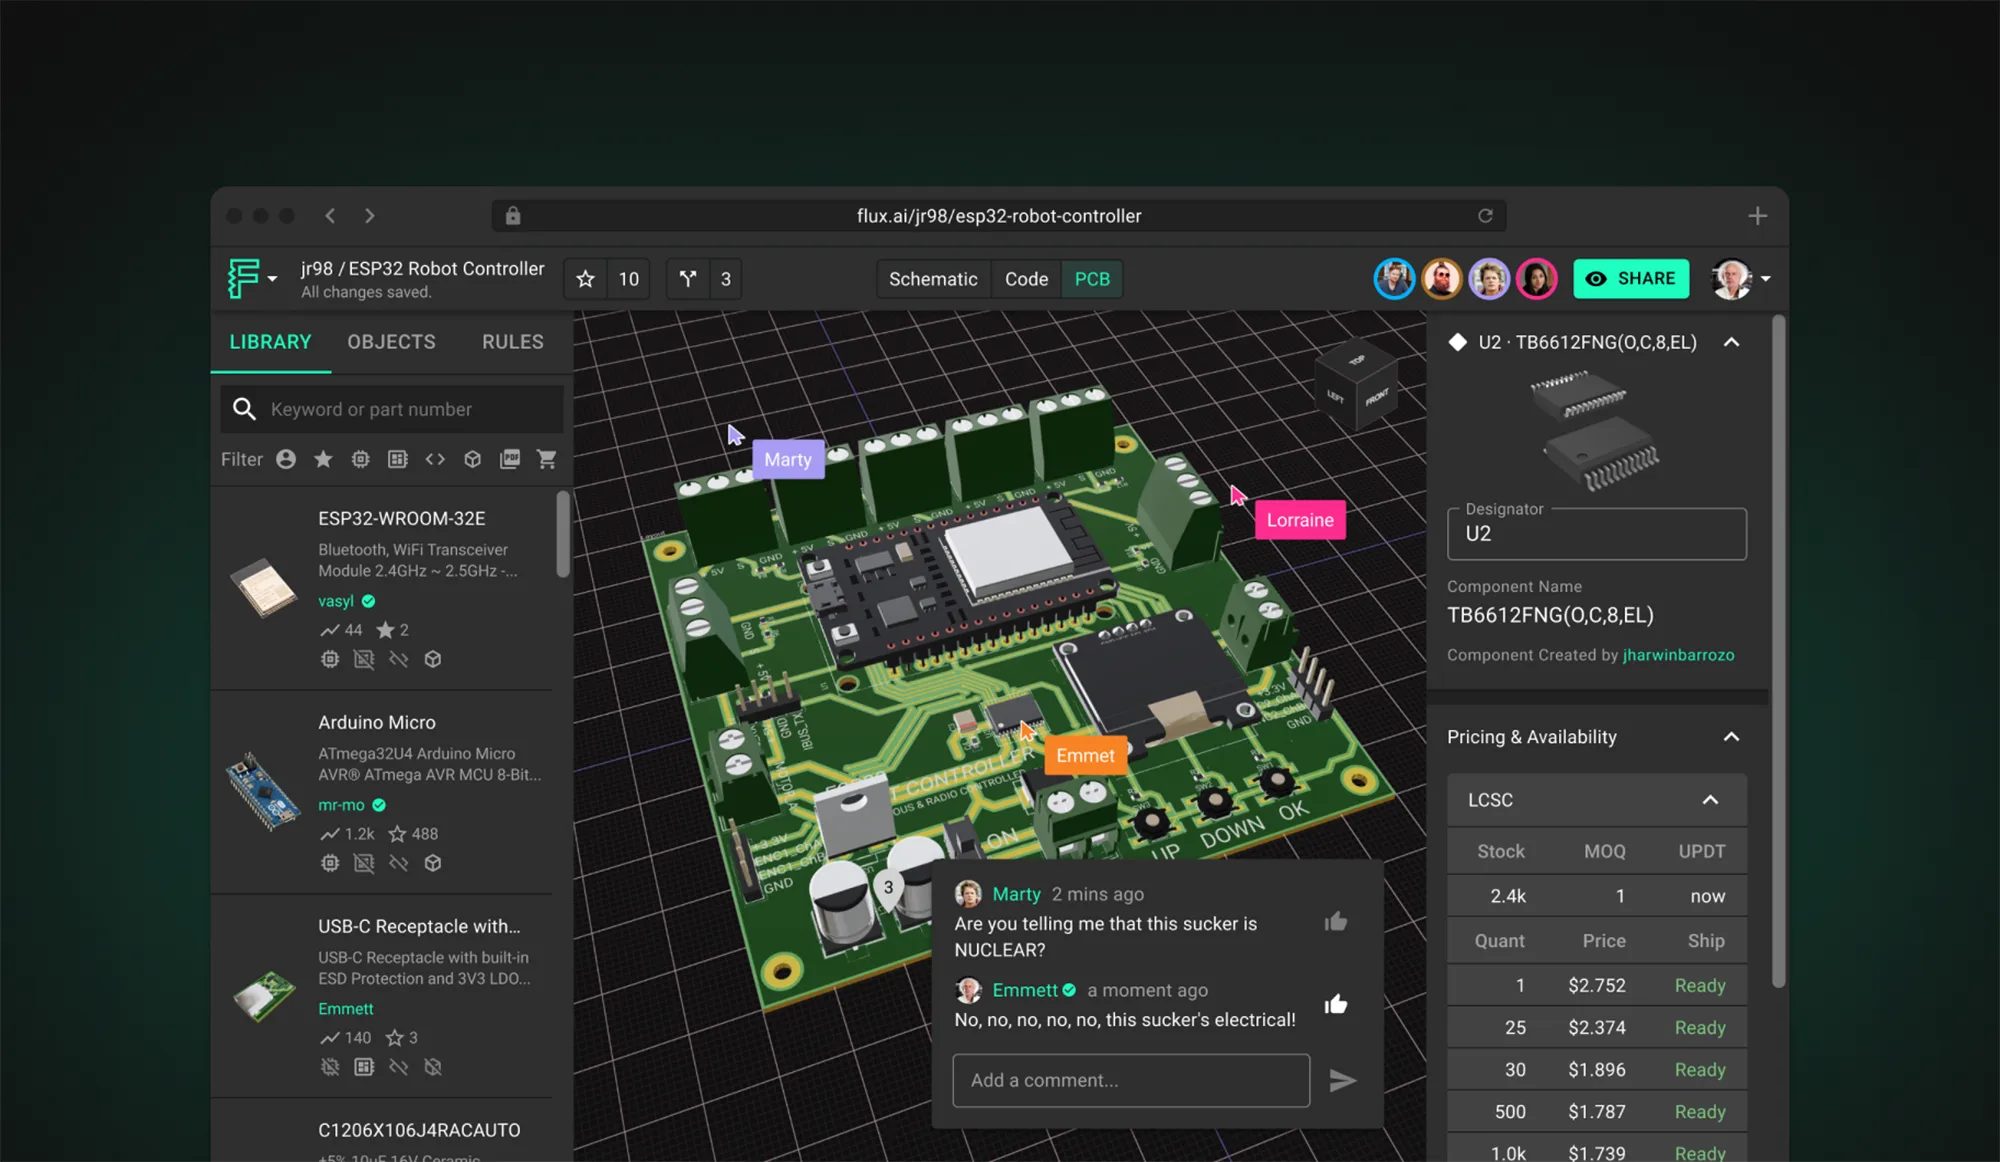
Copilot isn't operating in a vacuum. It's more than just an LLM generating text — it's an AI agent with access to real tools, structured data, and your active design context. Because it understands your schematic — the parts you’ve used, their interconnections, net names, designators, and annotations — it can reason about your design.
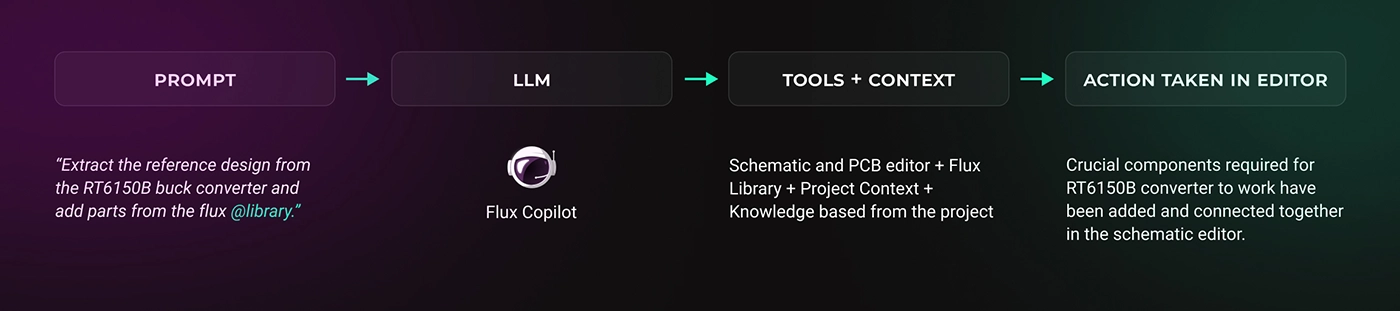
Under the hood, Copilot is connected to a series of tightly integrated tools, each exposing a specific capability:
Together, these tools give Copilot the ability to behave more like a true assistant with systems-level access — not just a text generator.
This kind of functionality bridges the gap between assistant and collaborator. It’s what makes Copilot feel less like a chatbot and more like a teammate. A junior engineer who doesn’t just explain what to do — but starts doing it.
And because Copilot isn’t just responding in a chat bubble — it's connected to your active design — it can take actions: edit the schematic, add components, modify net connections, and flag inconsistencies.
LLMs are generative. They don’t pull facts from a database — they generate answers word by word, based on statistical likelihood. This means they can hallucinate: confidently stating something that sounds plausible but is completely false.
In hardware design, hallucinations can show up as incorrect pin mappings, wrong default values, or oversimplified assumptions. This can lead to real mistakes if the user isn’t validating what Copilot outputs.
While Copilot can take actions inside your project — like editing schematics or inserting parts — some actions may succeed, others may only partially complete, and some prompts might be misunderstood altogether. This is especially true in more complex scenarios, where multiple steps or system-level understanding is needed. The goal is a seamless experience where intent leads to correct execution, but today, users should still expect to guide and verify every step.
Grounding Copilot in real data — through datasheets, project context, and part metadata — helps reduce these risks. But it doesn’t eliminate them. The model might overlook a constraint, misread a spec, or provide a solution that looks reasonable but doesn’t work in practice.
It’s essential to treat Copilot as you would a junior team member: capable, fast, but not infallible. Always review its suggestions. Provide feedback. Ask clarifying follow-ups. That interaction is what turns AI into a truly useful design partner.
We’re also actively working on helping Copilot surface uncertainty — so it can tell you when it’s guessing, and explain what it's basing its answers on (or what information it lacks).
Using Copilot effectively is less about being technical and more about being clear. It’s like working with a new hire who’s smart but unfamiliar with your preferences. The more context you give it, the better it performs.
If you’re looking for a regulator, don’t just say “add an LDO.” Try something like:
“Suggest a 3.3V LDO for an ESP32 with <100uA quiescent current and SOT-23 footprint.”
That level of detail dramatically increases the relevance of the result.
And because Copilot sees your schematic, you can ask things like:
“Which nets are missing decoupling capacitors?”
“Wire up a power tree for these ICs.”
“Add pull-ups to all I²C lines.”
These are tasks that might take you 10–15 minutes. Copilot can do them in seconds — not because it knows better than you, but because it has access to the same information and applies it faster.
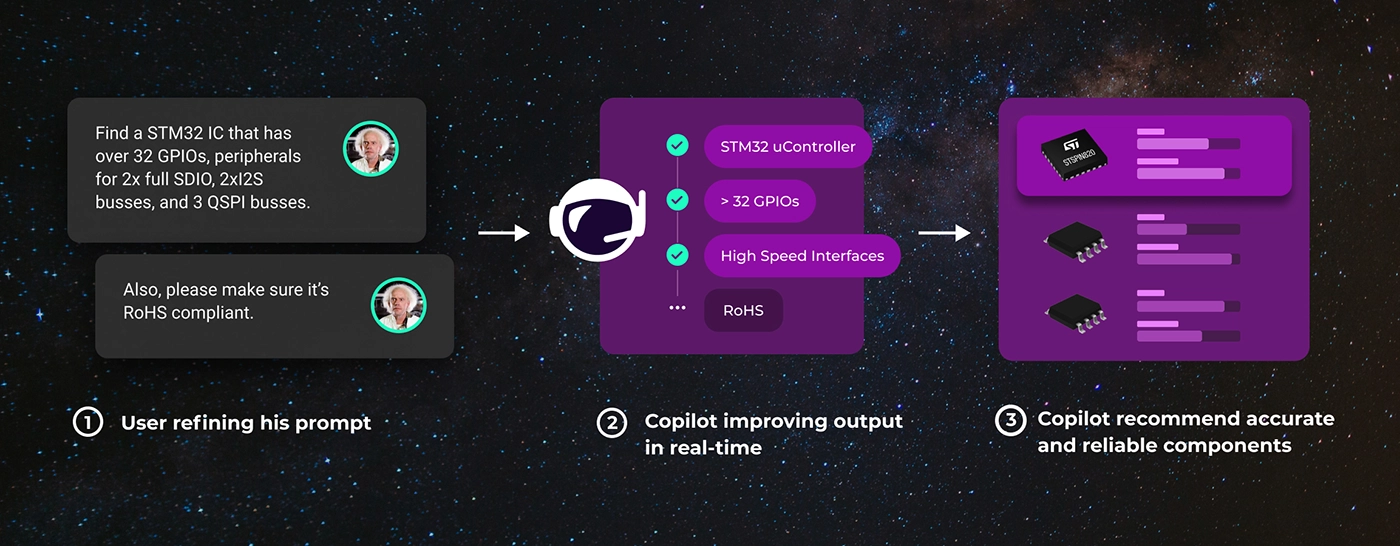
You can also refine prompts through iteration. If a response misses the mark, say:
“That’s too high power — optimize for <10mA draw,”
or
“I’d prefer a Texas Instruments part here.”
Copilot remembers the context of your project and previous replies. Treat it like an interactive design partner, not a search engine.
Getting better results with Copilot’s action-taking features — especially for part insertion and wiring — requires a bit of strategy. When asking Copilot to add parts, keep your request scoped to a small, related group of components. For example, instead of saying
“add a power supply,”
try
“Add an 500mA 3.3V linear regulator with a ceramic input capacitor and output capacitors,”
This helps Copilot reason about the function and relationships between components.
Similarly, when wiring things up, ask Copilot to connect two or three components at a time — like wiring up a sensor to a microcontroller with the necessary pull-ups — rather than asking it to connect an entire subsystem in one go. This makes the task more manageable, and improves the accuracy and completeness of the result.
And when it comes to reviewing your work, Copilot can already identify common mistakes, missing components, or inconsistent naming. As we continue building, that design review capability will become even more comprehensive — combining simulation, datasheet validation, and layout context.
Everything we’ve shown so far — contextual understanding, structured reasoning, agentic actions — is just the beginning. The real goal is to make hardware design more fluid, iterative, and collaborative.
We’re building toward a future where describing what you want is enough to begin the design process. Where Flux Copilot understands your intent, accounts for constraints, and takes meaningful steps forward — not just by suggesting, but by executing.
Imagine typing:
“Design a BLE-enabled temperature sensor with 6-month battery life. Optimize for low power.”
And Copilot delivers:
This isn’t sci-fi. It’s the direction we’re actively building toward — and your feedback plays a big role in making it real.
Copilot improves fastest when it’s used by real engineers solving real problems. Here’s how you can help:
Give feedback — What did Copilot do well? Where did it fall short? Be specific.
Train it — Add your naming rules, preferred suppliers, or circuit patterns to Copilot Knowledge.
Push it — Ask for things you wish it could do. Even if it can’t yet, your input helps shape what we build next.
You're not just using a tool. You’re helping define what engineering looks like when AI becomes part of the workflow.
Let’s build it together.
This post will give you a deeper understanding of how Copilot works, how large language models (LLMs) and agentic systems operate under the hood, and why grounding them in engineering context matters. You'll walk away with concrete strategies to get better results — and a clearer sense of how your feedback can shape the future of AI-assisted design.
If you've ever used an AI tool and felt disappointed, you're not alone. Engineers expect precision, and sometimes get something unpredictable. However, that doesn’t mean AI is overhyped. Rather, it means AI is evolving, and we need to learn how to work with it.
AI — especially large language models — is already an incredibly powerful tool. It can synthesize knowledge from thousands of documents, surface insights instantly, and assist in real-time decision-making. But like any tool, it needs to be used correctly. Understanding how it works helps you unlock its full potential.
That’s why we’re writing this. The more you understand how Flux Copilot works under the hood, the more empowered you’ll be to use it effectively, and help shape what it becomes.
At the core of Copilot is a large language model (LLM) — a deep neural network trained on massive datasets to predict the next token in a sequence. In practice, this means it can understand natural language prompts, reason across technical contexts, and generate structured responses.
LLMs aren't "search engines" or "knowledge bases." They don’t retrieve information, they generate it, based on patterns learned during training. This is both their power and their risk: they can generalize across domains and produce fluent output, but they can also produce confident-sounding nonsense — what we call hallucinations.
That’s why Copilot isn’t just a raw LLM. It’s an LLM grounded in structured, trustworthy data:
By combining generative reasoning with factual, contextual inputs, we reduce hallucinations and increase the reliability of Copilot’s suggestions. But it's not bulletproof. It can still generate plausible-sounding errors if the grounding data is missing, incomplete, or misinterpreted.
Copilot isn't operating in a vacuum. It's more than just an LLM generating text — it's an AI agent with access to real tools, structured data, and your active design context. Because it understands your schematic — the parts you’ve used, their interconnections, net names, designators, and annotations — it can reason about your design.
Under the hood, Copilot is connected to a series of tightly integrated tools, each exposing a specific capability:
Together, these tools give Copilot the ability to behave more like a true assistant with systems-level access — not just a text generator.
This kind of functionality bridges the gap between assistant and collaborator. It’s what makes Copilot feel less like a chatbot and more like a teammate. A junior engineer who doesn’t just explain what to do — but starts doing it.
And because Copilot isn’t just responding in a chat bubble — it's connected to your active design — it can take actions: edit the schematic, add components, modify net connections, and flag inconsistencies.
LLMs are generative. They don’t pull facts from a database — they generate answers word by word, based on statistical likelihood. This means they can hallucinate: confidently stating something that sounds plausible but is completely false.
In hardware design, hallucinations can show up as incorrect pin mappings, wrong default values, or oversimplified assumptions. This can lead to real mistakes if the user isn’t validating what Copilot outputs.
While Copilot can take actions inside your project — like editing schematics or inserting parts — some actions may succeed, others may only partially complete, and some prompts might be misunderstood altogether. This is especially true in more complex scenarios, where multiple steps or system-level understanding is needed. The goal is a seamless experience where intent leads to correct execution, but today, users should still expect to guide and verify every step.
Grounding Copilot in real data — through datasheets, project context, and part metadata — helps reduce these risks. But it doesn’t eliminate them. The model might overlook a constraint, misread a spec, or provide a solution that looks reasonable but doesn’t work in practice.
It’s essential to treat Copilot as you would a junior team member: capable, fast, but not infallible. Always review its suggestions. Provide feedback. Ask clarifying follow-ups. That interaction is what turns AI into a truly useful design partner.
We’re also actively working on helping Copilot surface uncertainty — so it can tell you when it’s guessing, and explain what it's basing its answers on (or what information it lacks).
Using Copilot effectively is less about being technical and more about being clear. It’s like working with a new hire who’s smart but unfamiliar with your preferences. The more context you give it, the better it performs.
If you’re looking for a regulator, don’t just say “add an LDO.” Try something like:
“Suggest a 3.3V LDO for an ESP32 with <100uA quiescent current and SOT-23 footprint.”
That level of detail dramatically increases the relevance of the result.
And because Copilot sees your schematic, you can ask things like:
“Which nets are missing decoupling capacitors?”
“Wire up a power tree for these ICs.”
“Add pull-ups to all I²C lines.”
These are tasks that might take you 10–15 minutes. Copilot can do them in seconds — not because it knows better than you, but because it has access to the same information and applies it faster.
You can also refine prompts through iteration. If a response misses the mark, say:
“That’s too high power — optimize for <10mA draw,”
or
“I’d prefer a Texas Instruments part here.”
Copilot remembers the context of your project and previous replies. Treat it like an interactive design partner, not a search engine.
Getting better results with Copilot’s action-taking features — especially for part insertion and wiring — requires a bit of strategy. When asking Copilot to add parts, keep your request scoped to a small, related group of components. For example, instead of saying
“add a power supply,”
try
“Add an 500mA 3.3V linear regulator with a ceramic input capacitor and output capacitors,”
This helps Copilot reason about the function and relationships between components.
Similarly, when wiring things up, ask Copilot to connect two or three components at a time — like wiring up a sensor to a microcontroller with the necessary pull-ups — rather than asking it to connect an entire subsystem in one go. This makes the task more manageable, and improves the accuracy and completeness of the result.
And when it comes to reviewing your work, Copilot can already identify common mistakes, missing components, or inconsistent naming. As we continue building, that design review capability will become even more comprehensive — combining simulation, datasheet validation, and layout context.
Everything we’ve shown so far — contextual understanding, structured reasoning, agentic actions — is just the beginning. The real goal is to make hardware design more fluid, iterative, and collaborative.
We’re building toward a future where describing what you want is enough to begin the design process. Where Flux Copilot understands your intent, accounts for constraints, and takes meaningful steps forward — not just by suggesting, but by executing.
Imagine typing:
“Design a BLE-enabled temperature sensor with 6-month battery life. Optimize for low power.”
And Copilot delivers:
This isn’t sci-fi. It’s the direction we’re actively building toward — and your feedback plays a big role in making it real.
Copilot improves fastest when it’s used by real engineers solving real problems. Here’s how you can help:
Give feedback — What did Copilot do well? Where did it fall short? Be specific.
Train it — Add your naming rules, preferred suppliers, or circuit patterns to Copilot Knowledge.
Push it — Ask for things you wish it could do. Even if it can’t yet, your input helps shape what we build next.
You're not just using a tool. You’re helping define what engineering looks like when AI becomes part of the workflow.
Let’s build it together.


We’re not just offering a tool; we're building a home where the open-source hardware community can truly flourish. Join us in this exciting journey toward a more collaborative and innovative future.

Today, we’re taking collaboration one step further by giving hardware teams a shared virtual space that’s built for innovation. Today, we’re launching Flux for Organizations: a new way for hardware teams to collaborate.
This guide shows how to collaborate with Flux at the schematic stage. You’ll learn how to describe your intent clearly, guide the AI through design decisions, and review results so each iteration gets smarter.

Imagine an AI teammate that doesn’t just chat about your PCB ideas, but actively transforms them into schematics—placing parts, connecting circuits, and optimizing your design at your command, all through natural language. That’s exactly what the newly overhauled Flux Copilot does.
We’re incredibly excited to announce that we have decided to open up Flux and move out of private beta! What does this mean? If you’re a current user of Flux - nothing will change for you. For new users, this means that we’re now allowing anyone and their team to signup!

The SNES controller revolutionized gaming with its ergonomic shape, responsive buttons, and innovative shoulder controls. Its design set the standard for modern controllers. Even today, it remains a blueprint for comfort and precision in input devices.
Understanding amps and volts is key to working with electronics. This guide explains their roles, relationship, and practical applications.

Designing an AI pin would normally take months, but in this project, we did it in hours. In our step-by-step guide, you'll see how Flux can accelerate your design process and bring your AI pin project to life.

ESP32 microcontrollers are affordable, low-power SoCs with integrated Wi-Fi and Bluetooth. Offering dual-core processing, ample memory, and versatility, they excel in IoT, wearables, and smart home applications. The ESP32's continuous evolution promises exciting possibilities ahead.
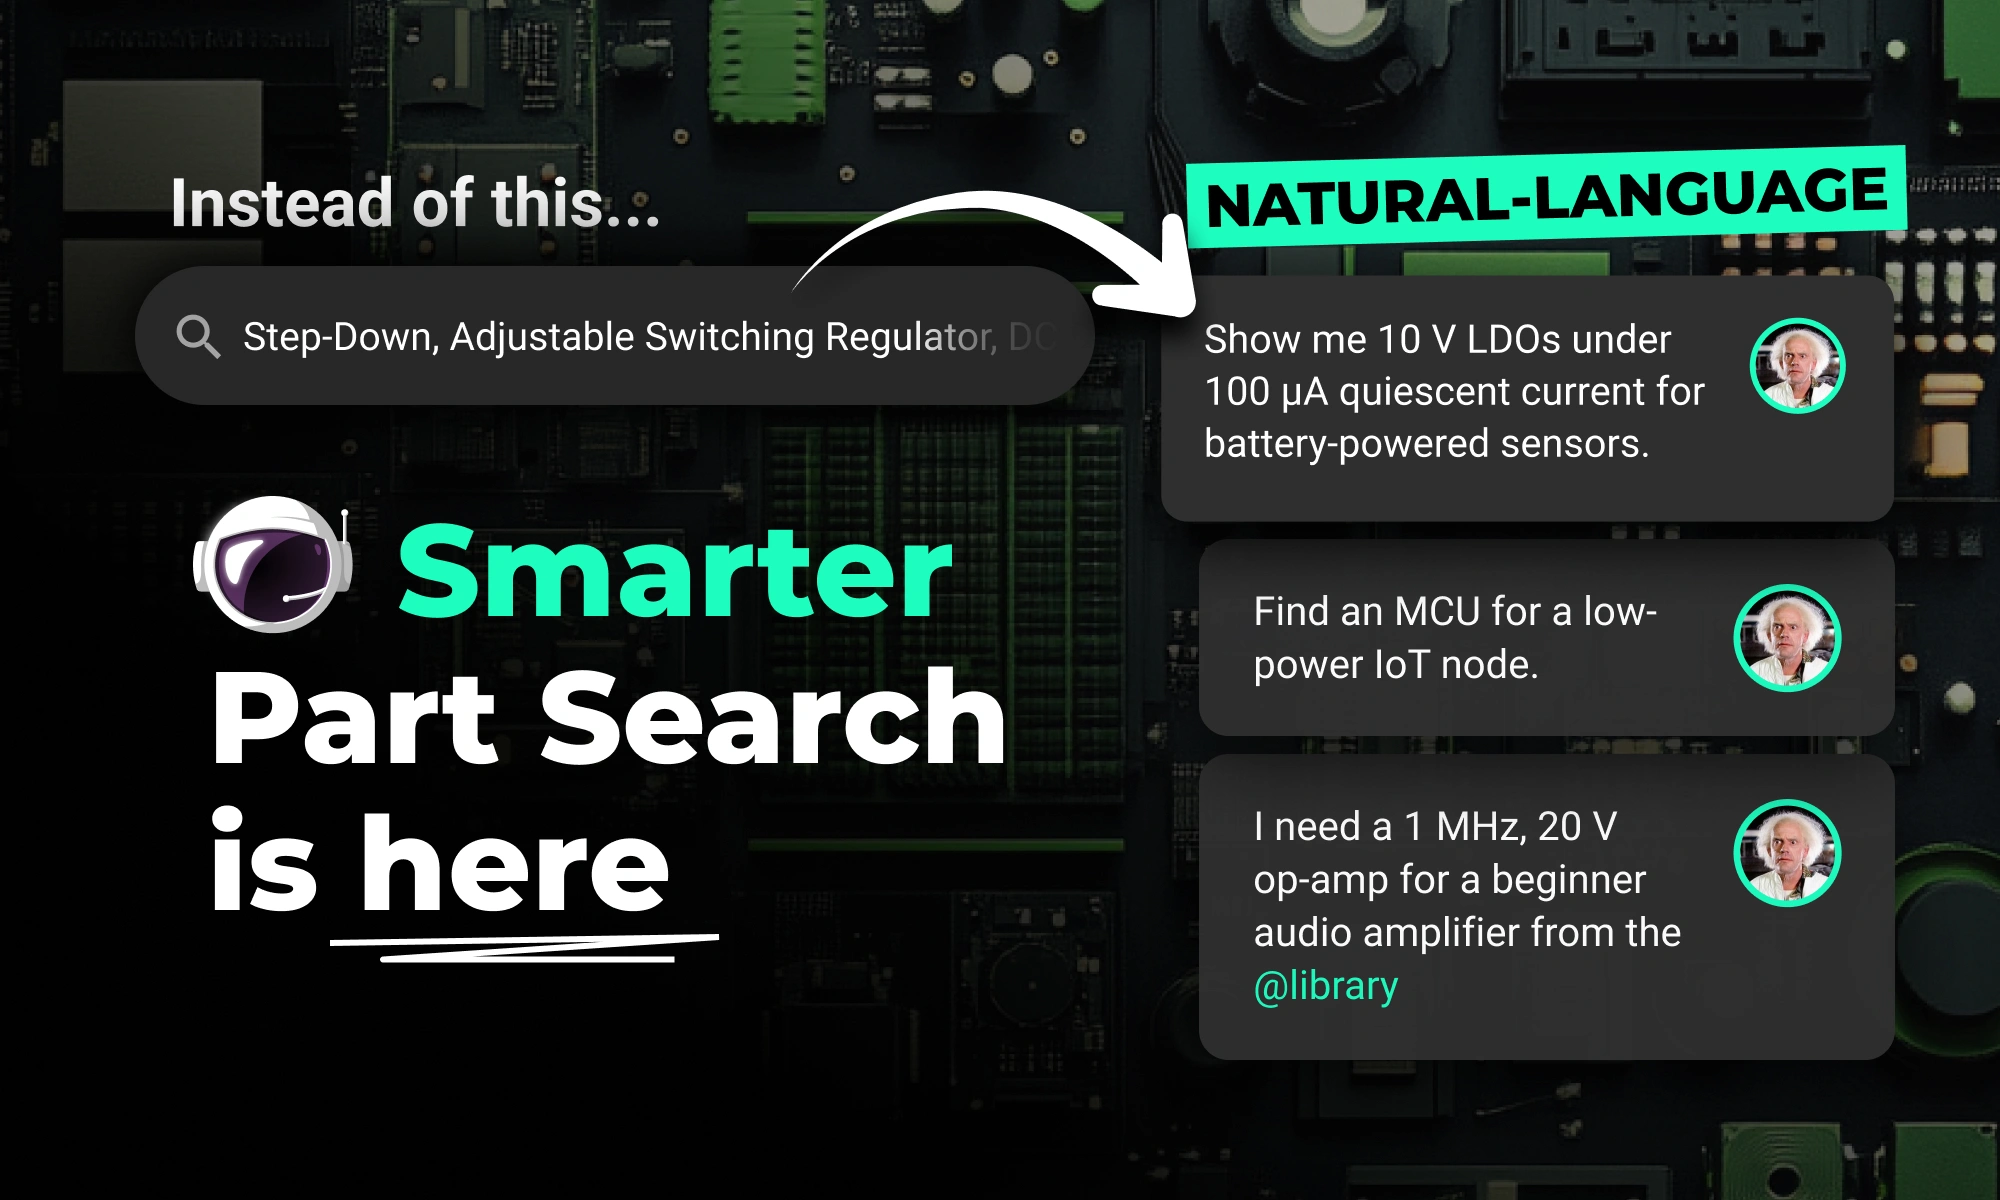
Flux Copilot’s new AI-powered part search makes finding and placing components faster and easier using natural language. It eliminates tool-switching and datasheet overload. This streamlines your PCB design workflow.

Discover how Copilot transforms hardware design from concept to creation through an end-to-end example of designing a webcam, showcasing the power of AI hardware design at every step.

Open Flux now, switch Copilot to “Next-gen” and see how it handles your next design challenge. The sooner you try it, the more your feedback can shape the next leap in AI-powered hardware design.